Showing posts with label Ink. Show all posts

Monday, 3 November 2014

3D - Research Sheets - 21st Century Architecture

Following my work with styrofoam and having had an introduction to the different workshops. The next brief I received was entitled 'Research'. For this I was tasked with researching 21st Century Architecture and creating 2 work sheets which I then worked into them.
For my research I went over to Pinterest mainly as its easier to store the photos I find if i need them for a later date. After collecting a lot more then what I needed I went to work in creating my 2 A2 pages. First off I gave the sheets a quick watercolour wash to help break up the strong white background to help prevent making my drawings becoming very flat and 2D.


For this first sheet I wanted to go with a very square focused research sheet. After letter my black and brown wash dry I went to sorting my images I found and picked out some of my favorite modern buildings and torn them out to give the images a more organic look. Once stuck down I went to recreating some of the building with my own pen drawing. I wanted this sheet to be very neatly drawn as I felt the contrast with the rough background and sharply ripped images really helps the ink work pop off the page.


Now unlike my first sheet I went with a more curved image base and because of this I wanted my drawing to be very quick and less perfected to see what sort of design would come of this. Since its the opposite of the first I think the two sheets together look really nice but I still prefer the first mainly because of overall finish it ha.

Sunday, 12 October 2014

Fashion: Charcoal Drawing & Development

 In one of my last lessons in Fashion, I was tasked with producing 2 quick 15 minute sketches of paper manipulated dresses with charcoal. After producing two then I was to work into one of them with paints, inks, newspaper etc but keeping in the theme of Mono Mania. So black and white.


Above is the first of my charcoal drawings and the one I didn't work into later on. This was my first quick sketch and as such isn't complete as I missed judged the time I had to get down all the details I needed to make it fully complete in my eyes. It did help me though as it let me experiment with different stroke types and smudging techniques before moving onto my 2nd piece.


Above in my final piece I produced from the morning. It started off as a charcoal sketch very much the same as the one above but as I finished this one and had put more effort into it in the charcoal stage I wanted to take it even further. So I worked into this one more. First off I added newspapers to the scraps in the middle to give the piece more depth. As well as that I added wax [Which i had experimented with in my Batik work] to the bottom section of the skirt to give it some extra interesting detail I couldn't get with the charcoal. Next I added white paint around the edges of the main stem straps to help make it pop off the page as the original piece I worked from had almost highlights in those places from the natural lighting in the room. Lastly I added ink over the wax and white paint to bring back the original charcoal shading I had added on, finally going back over the piece with charcoal adding in details here and there.
I really like work with mixed media and it's something I consider to be one of my strongest strengths. I like the idea of mixing multiple techniques together to see what new and interesting effects can be made. Which I think worked really well with this pieces skirts. The mixture of Ink, Wax and Charcoal really bring the skirt to life.

Friday, 10 October 2014

Batik - Wax & Ink

The next experimental piece I had a go at was using the Batik keetle to drip wax onto card and after drying, then painting over it with black ink. To create this sort of ink floating on water effect. Once both the wax and ink had dried, I removed the wax my putting the piece in-between newspaper and then ironing over the whole thing to melt off the wax but leaving the design still on the card.


Having made 2 sheets of wax on card, I ironed one and then cut it up in a diagonal way and then stuck it down in my sketch book partly over black card to show off the different effects layer up this batik styled piece can have. For example as seen above having iron off the fax it has almost made the piece see-through and lets the black card almost shine through the piece, darkening it. The 2nd piece I made, As seen on the right I left un-ironed. So the wax is still think on the page and bulging up front he page. This gives a different effect to the ironed, as the wax hasn't been melted away so the piece is still thick and raised from it, giving the piece almost a sense of depth. 

Saturday, 4 October 2014

Printed Images - Manipulation linking to Bridget Riley & Victor Vasarely

Following my Monomania foam printing work, once all the prints on fabric and paper had dried I went onto photocopying these pieces in A3 and A4 sizes and went to work with the scissors once again and taking what I learnt from the original paper manipulation and mixing that in with these new prints, I aimed to create a bunch of different unique patterns. Doing so by cutting the photocopies, mounting on card, weaving, overlaying and all round working with paper on paper.


So my main goal with these pieces was to try and recreate some of the techniques seen in Bridget Riley's and Victor Vasarely work. By using the same sort of line structure as them. Using waves and very sharp straight lines. To add my own spin on that I aimed to layer these techniques and using the original prints as back drops.
As well as doing that I added in paper and card to to help break up some of the more intense designs so not all the detail was lost. For example the first image, since I purposely used a waveform that went against the striped print it really pulls your eye in, very much like the OP art I've been researching and trying to mimic here. But by adding in the bland newspaper it helps break that down a little bit and once the viewer pulls away they can look into the less detailed part and this helps let the design pop out.
Following that the same sort of thing happened in the second image but the use of newspaper was more to pull the design off of the black back ground as the print was printed on black too. So by adding newspapers it helped further push the design to the front and lets the spaces between the cut strips go to work in drawing in the viewers eye.


Now for the last 3 they were the first 3 I worked on trying to recreate the very essence of Bridget Riley's work and how she used her lines to create movement. However I wanted to do that in revere with the first 2 prints. Having the prints as the background and working with cut paper to create a sense of movement in the work. I feel this worked best in the first piece as its a very simple overlay which creates this sense of stubble overlap that lets the design really pop off of the page. However in the second piece I feel the overlay is a little to extreme and the sense of movement is lost, but it came in handy as a learning tool to know what not to do next time. because of this when it came to having my sewing machine induction I used this piece to test out the different needle widths, lengths and zipzag spacings which can be seen below.
Lastly is a very simple but effort use of straight cuts of one of my black prints put onto white card which really helps break up the design and lets the white ink almost blend into the background. I feel this piece most represents Bridget Riley's work in my own style.


Saturday, 27 September 2014

Monomania - Foam Printing

Foam print block making :|
Making a mess with paint and printing :D

Possibly the best way I could describe this session. I can't help but love anything where I get to be messy and make unique mess into something fun and creative. Following my work on the shape shape I picked one of my final shapes to make out of a piece of foam which funnily enough is from the bottom of a pizza box but enough of that. To cut the foam I used a soldering iron which utterly stunk up the room I was working in so we had to open all the windows. I'm just glad I went first so I didn't have to stand around for ages waiting to cut my shape and having to smell what I can only describe as a melting rubbish, kind of smell.


I think my shape turned out rather well considering I hadn't held a soldering iron since i was about 13 in DT class back in school. I didn't just want to use my shape for the printing block as it would make the print very bland and boring so i added a few drops and squiggles here and there. Which as you'll see below really helped when it came to adding the acrylic paints and printing.


I produced patterns with my tear drop styled foam print block on 4 different types of material, black paper, white bin liner, white fabric and stripped fabric. Using 3 different colours of acrylic paint, white, black and grey and it go messy fast. I wish i took a photo of my hands at the end of it. I still have paint dried on my nails at the time of writing this.
I really enjoyed making these prints as it was a very unique process for me and the way all the work has been linked together. Having to move the block in different directions and overlapping of different colours made some really interesting patterned appear. For example I really love the way the prints look on the stripped fabric as where I cut away at the foam print you can see the fabric coming through the prints as well as where there was less ink on block giving the print a very unique look which will give even more depth once the excess material is cut away. Using a foam block is a very quick and easy way to make a printing block and is something I would like to incorporate into some of my work later down the line as it would come in handy when working on mixed media piece as a little something extra.

Friday, 19 September 2014

Ink & Charcoal - The mess continues..

Following the previous day and making a 3D model of an insect i drew [Links in previous post] The next thing I did was to experiment with Charcoal and boy did it get messy. The plan was to focus closely on a small part of our models [Mine being a moth] and blowing it up on an A2 piece of brown paper. We were given 30 minutes of each drawing, the first of which i decided to focus on the top of the model and part of the top 2 wings trying to add some depth by looking at it from a slightly angled birds eye view.
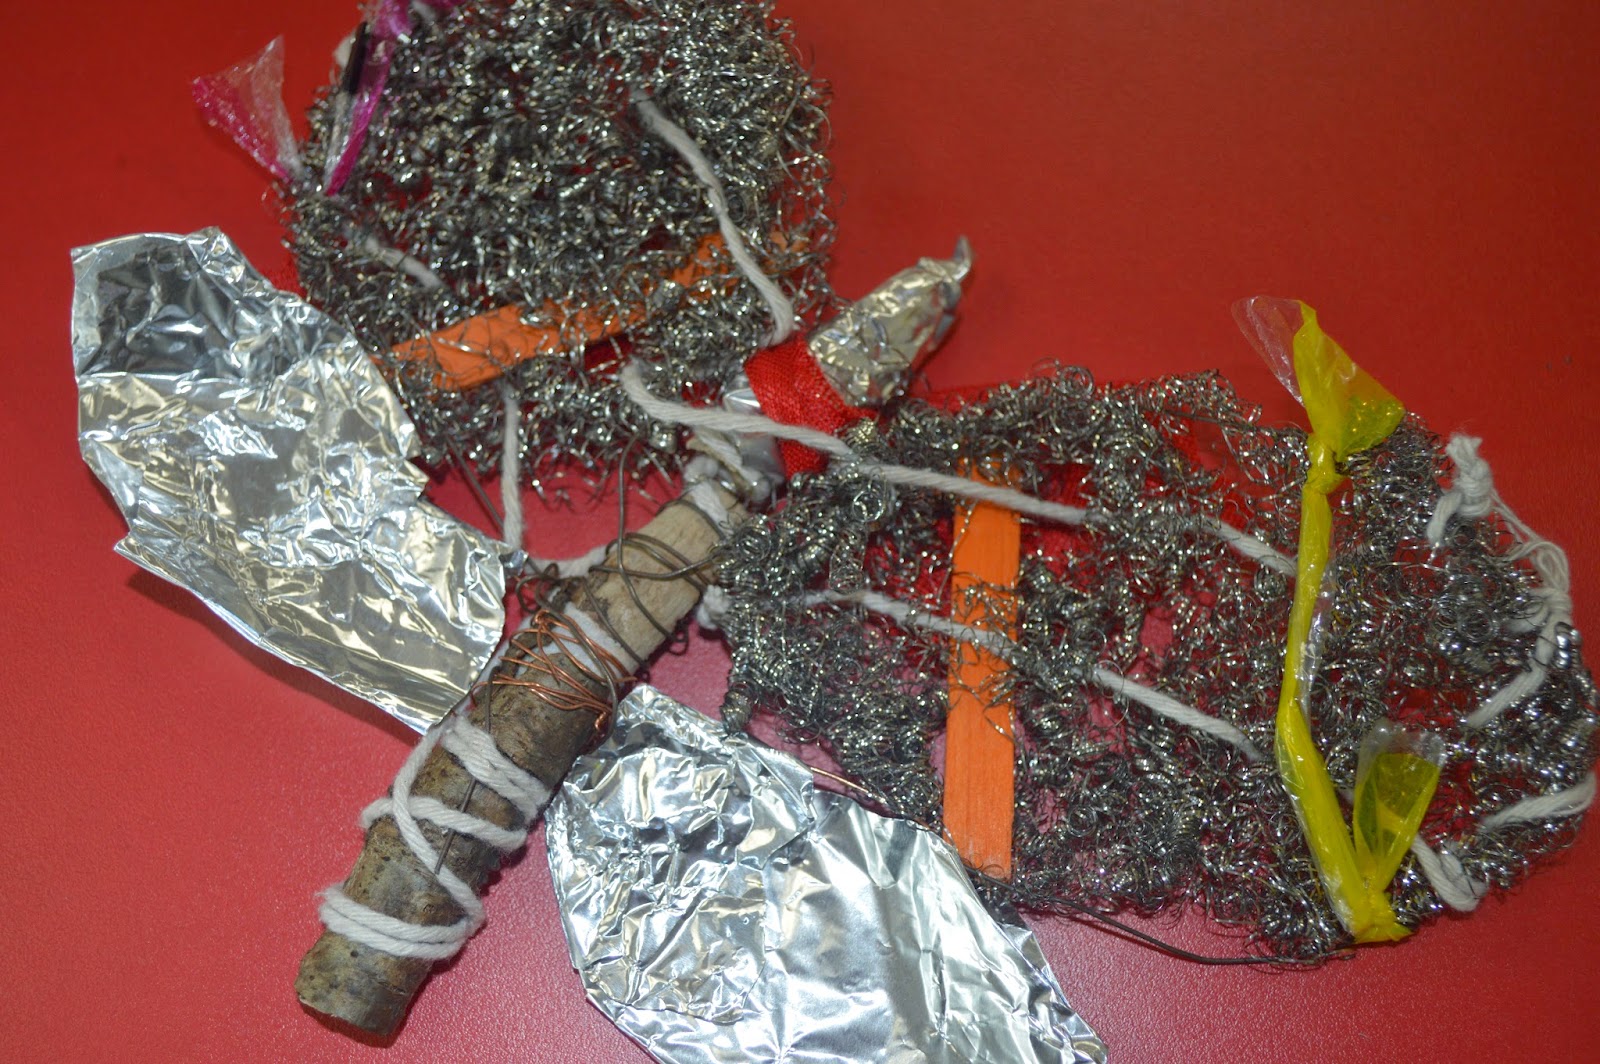


First off I'll comment on the time, we were given 30 minutes and for this first drawing i definitely took on more then i first thought was possible. I spent to much time trying to get the details of the string and plastics to have some impact through the steel wire that i didn't have time to even attempt the 2nd wing but for the amount i did complete i really like. Charcoal is a very messy material to use but once you get into the shading you can make some really interesting things happen, for example i think it really help make the string pop over the steel wire to give the image a lot of depth. 
Next we did another 30 minutes drawing with the same material and concept but this time to try using just lines and less shading.


This time i went for the same sort of angled birds eye view but from the bottom section of my moth and i really like the way this piece turned out. Once again we had 30 minutes but i feel i managed that time a lot better and was able to get some really good detail from the line work on the wooden end. As well as focusing on the bold string and wire work around the wood centerpiece.
Next onto the real mess. Indian ink time!


Now this is something i really enjoyed. I used very simple tools, White A2 Paper, Indian Ink Black and a Coffee stirrer, Yes one of those, one end was cut at a 45 degree angel to cause a very fine line when used with the ink and then the other end left as was in a circular shape which worked very well for thicker lines. 
With this drawing i decided to focus on the top again but concentrate it more on the upper right then just the whole top to help cut out the problem of time issues and i went in and it sure got messy fast but was very interesting to determine how much ink i need to apply each time to get the same effect i just made. For example with the wings i was trying to make a crisscross sort of effect but instead of just tapping away i changed my stroke to make the lines thicker in other places to attempt to add more depth within them. I think it worked well for a first try. The one thing i couldn't get to work in my favour was the string, i couldn't get it to pop as i added to much ink to the wing and didn't fade it out well enough. I'd definitely go back and try that different next time.